Tuesday, July 19, 2011

Cowl Neck Tee Refashion: a tutorial

.


Materials Needed:

Tee (Scoop neck worked well for me)

3/4 yd lightweight, flowy fabric
-- Doesn't have to be lace, just try to find a fabric that you think would drape well, nothing too stiff--


Found my scoop neck at Target for $8. It's the same tee I used in this tee refashion. 

If you haven't noticed, I'm a total Target junkie. Seriously, I'm there at least once a week. I may have a problem..


Tutorial:


Measure the circumference of the collar of your tee.


Add 3 inches to that number. This will be the length of your rectangle
i.e. My collar measured 34" so the length of my rectangle is 37"


I went with a 26" width, Leaving me with one rectangle 26" by 37"


Fold rectangle in half (hot dog style) and sew down the long side of the rectangle.

I used a wide zig zag stitch. It seemed to do a better job at mending the lace together.


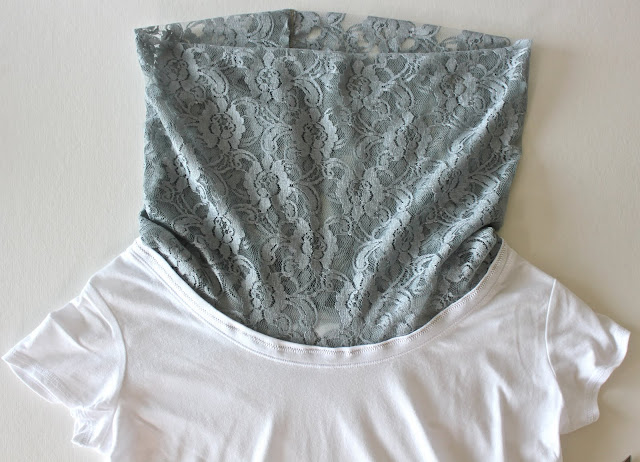
Turn your tube right side out and you'll have something like this:


Beginning at the back of the collar, pin your fabric around.


When you've come full circle, it will look something like this:


Insert one end into the other.


Fold in the edge and pin in place.


Sew down this line.


Again using a zig zag stitch begin at the back of the shirt and sew the fabric along the collar.

Be very aware of what layers of fabric you're sewing through. It's very easy to accidentally catch a section of fabric that you don't mean to.


Don't worry about making the stitch pretty. It won't show


Done! Looks a little funky like this but don't worry. Try it on and let the fabric drape naturally. 


Neat, huh? Kind of like a permanent infinity scarf.


I forsee making more of these lovelies come fall. Ugh I can't wait! Give me cardigans, flats, and a cool autumn breeze please. 


A Perfect little top for our sushi date night...


Have a lovely day (:


Linking to...
...


SHARE:

Friday, July 15, 2011

Gryffindor Bow Tie Top


Oh yes I did. 


  Last night was the premiere of the final Harry Potter movie and we had our tickets purchased last week. I realized yesterday afternoon that I needed something to wear to the harry potter premiere. So I got some cheap gold fabric, maroon paint, and some gray knit, and got to work!


I wasn't the only one who had the bright idea of dressing up last night. There were of course Harrys,  Rons, Hermiones, a Luna Lovegood, and even a Voldemort! There were also a few scantily clad girls who seemed to think that a naughty school girl's halloween costume passed as Harry Potter wear. Not so much. 


 Boyfriend is the real Harry Potter fan. He's the reason I got into the series at all. We were 11 when the first movie came out, the same age as all the characters (we're young'ens I know), so we got to grow up with them. Bittersweet to see it all end. 


See the tutorial for this top here:


...

SHARE:

Wednesday, July 13, 2011

Simple Bow Tie Top : a tutorial

.


I'm so happy about how this turned out. This is one of those projects that's been on my to do list forever and now that I finally got it done, I wish I had done it a long time ago. 


This is such a simple project. One of the easiest I've ever made. Don't have much sewing experience? Give this a go, I promise it's a piece of cake and any mistakes made are hardly noticeable because of the gather. You can make this project even easier by purchasing ribbon rather than sewing your own sash. 


Materials:

                 5/6 + yard knit     &     1/3 yard  silk, cotton, etc.                                     (any of these fabrics would work)


My knit is 60" wide  and my dusty pink silk (faux) is 45" wide.
Your fabric doesn't have to be exactly as wide as mine, just keep in mind that if you buy a fabric that is less wide you may need to purchase more to compensate.


Cut two large squares to the dimensions of  30" x 30"

If you bought 5/6 yd of 60" fabric all you have to do is cut along the fold line.

**Edit- 30" length gives you a long top. I ended up cutting off 4-5" off the bottom. I left the measurements this long to allow plenty of length and room for the bottom to be hemmed**


Make a casing at the top of each square. About 2" wide. 


Sew down with a zig zag stitch (so it can stretch).


Start working on your sash. This is pretty much the same process used here in the big bow belt tutorial. 

-UPDATE- 

I made a mistake when I made my sash and cut where I shouldn't have. So your process may look slightly different than mine in the pictures to follow. When in doubt follow the instructions and don't let the pictures confuse you (:

....

Cut right down the middle of your fabric so that you have two 45" by 6" strips. 


Sew your two strips together (Short sides with right sides together)


Now that you have sewn your two strips together you have a 6" wide by 90" long strip. Fold the sash in half hot dog style and sew a point as shown below. Then continue to sew down the long (90") side.


Leave about an 8" gap in this seam so that the sash can be turned inside out. 


Cut off extra fabric


and turn the tube right side out. 

The finished sash will be roughly 90" by 2.5" ( or a little less because of seam allowances).


Press and either sew a top stitch around the entire perimeter or secret stitch your opening.


Use a safety pin to pull the sash through both panels of fabric.


At this point I tried it on and determined where  the seams on the side should begin. I marked this place with a pin. 


Pin along sides. 


and sew together. 


Hem or serge the bottom if you like or leave it raw like I did. 


Voila. Done!  I told you it was easy. 


A breezy, summery top. Perfect for this ridiculously hot weather. 104 here in Texas!


...

SHARE:

Sunday, July 10, 2011

Cap Sleeve Blouse: a tutorial


This top was made using my Make Your Own Pattern Tutorial.  I'm loving how it turned out and it was really easy too!


Once you get all the pieces cut out, it's just a matter of a few seams and some ironing work, before you have your own handmade, beautiful top.


Fabric

I would recommend choosing a lightweight fabric for this project. Thin cotton, seersucker, knit, and really any kind of apparel fabric would be a great choice. I used Denyse Schmidt's Greenfield Hill Voile in cranberry, purchased here at Pink Chalk Fabrics.  Voile is one of my favorite fabrics to work with and perfect for this project. It kind of feels like a blend of cotton and chiffon. It's also less apt to fray than some fabrics. There's no definitive back or front to voile, making it even easier to sew a garment like this with. 

I used about 1 1/4 yard for this pattern and had a good amount left over for my scrap collection, yes! Always remember to prewash and iron your fabric before starting. 


Tutorial:

Using your self made pattern, trace all the pieces onto your fabric and cut out. Go ahead and cut the regular sleeve pattern. I'll show you how to modify it below. 


Place your front and back piece right sides together and pin.


Sew a straight stitch everywhere shown below.


Iron all seams open.


Press the hem at the bottom. I like to purposefully leave my selvage at the bottom so that I can use it as a guide. 


Hem the collar and armholes as well. This takes a little manipulating, and is probably the hardest part of the process. Don't worry about getting it perfect, you just need a guide before you take it to the sewing machine.

Another option would be to sew on a binding. 


Sew in place. 


Now for those cap sleeves. Pinch a section of fabric and bring it over to the center of the sleeve. Press. 


Pinch a section from the opposite side and bring it over to meet the first pleat. Press.


Stitch just over the pleat to keep it in place. 


This part I just eyeballed. I think a good marker is to cut so that the sleeve goes around half the circumference of the armhole. 


Stitch the sleeve in place. The center of the pleat should meet the seam of the arm. 

Bind, hem, or serge the edge of the sleeves. I skipped this step because, I was so antsy to wear my top. I will definitely do it before putting it in the wash though. 


Add any embellishments you like. I added a little lace tape ( See instructions here). 


That wasn't so bad right?! 


I'm loving the retro feel. 


Enjoy and have a lovely day!


...
SHARE:
Related Posts Plugin for WordPress, Blogger...
Blogger templates by pipdig